


Styling can be one of the most intimidating parts of food and product photos and it's something I get asked about a lot. To take the frustration out of styling, I want to let you in on my favorite compositions for flat lay and eye level photos.
The best part? They both look super impressive when photographed, but are unbelievably easy to create yourself. Basically, the best combination ever!
Update: this how-to was begging to be made into a YouTube video, so here it is! If you'd rather read it, just keep scrolling.
Flat lay photos: the “C”
The first composition is for flat lay photography. Flat lay can be especially intimidating because you’ve got this giant canvas. It's tempting to slap down props without considering the story you’re trying to tell or thinking about the flow of the viewer’s eye. A great way to control where the eye moves is with the “C” composition. The trick here is to arrange all of your props in a crescent shape, leaving the middle area bare.

The "C" draws your eyes from one prop to the next in a pleasing way. The photo feels composed but not overly styled. Your eye may follow a different path, but mine goes from the chocolate chips in the bottom left, to the pile of chips in the center, up to the vanilla bottle (since it's similar in color to the chips), and finally leftward to the gorgeous gold spoon.
Contrast the “C” with this photo. Same props, no C-shape. The whole thing feels more haphazard. Your eye doesn’t know where to start, let alone where to go after that.
The “C” works beautifully for products, too, and it’s easy to imagine how you can use it to showcase your line of beauty products, candles, handmade items, jewelry, and more.

Here, we’re using the same "C" to feature the art of an incredible artist and friend: The Mint Gardener.

Of course, you can flip the "C" too. Which actually makes it a true "C" now that I think about it! Which do you prefer: bare area on the right or left? Let me know in the comments!
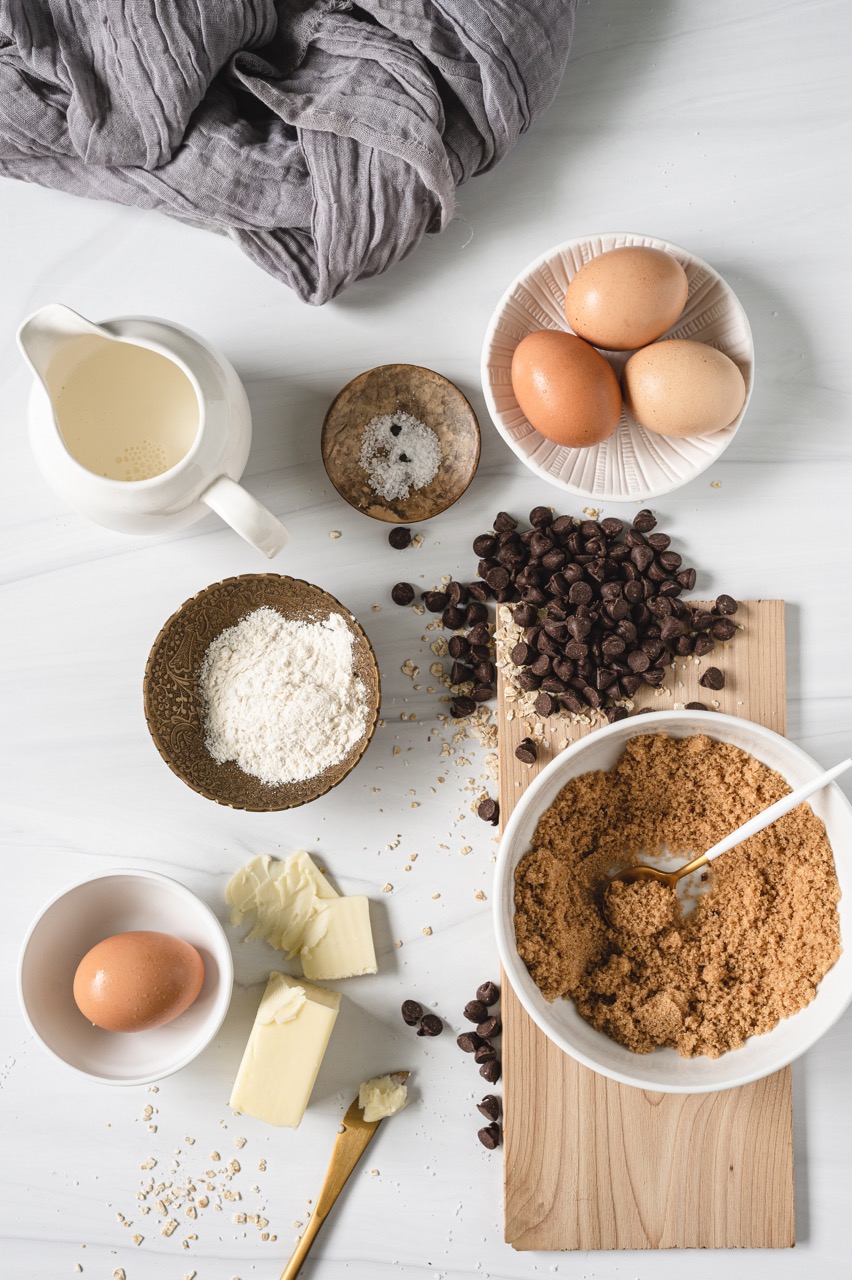
So let’s build a “C” using this baking ingredient example! First, watch it come together in gif-form, then we'll build it step-by-step. As you watch the gif, try to envision your recipes or your product line in place of the bowls. Also, start thinking about accessory props that you could use to fill in the gaps between dishes or products.
Alright, now let's slow it down and talk about each step. You don't have to follow this exact order, but it'll give you an idea of the thought process behind building something visually appealing. Swipe to scroll through photos of each step.
The “C”: Step-by-step
- Create a "C": Start by placing your largest objects in something resembling a C. Clustering objects slightly and keeping some uneven spacing between them is most visually appealing and will give you room for accessory props.
- Add a different shape: Add a flat object in a contrasting shape. For food, great options are rectangular objects like a cutting board, cooling rack, or pot holder to break up all the circles. For products, try a flattened towel, piece of colored paper, or a plank of wood.
- Assess and edit: Assess whether you can add in a more visually interesting prop and swap it in. Here, we preferred the pinched shape of the cream pourer and swapped it for one of the small bowls.
- Add contrasting props, like the black kitchen tool in the top right corner.
- Add a fabric element to fill in empty space along the side or top. Either a dish towel, fabric napkin, or scarf.
- Fill your bowls (if you’re styling food).
- Add linear props (like this butter stick and the spoon in the brown sugar) to break up all the circles. Place linear props so that they point toward the next object in the scene to help the viewer's eyes move around the scene. For products, sprigs of greenery or flowers make great linear props. So do the tools you use to make your product: brushes, knitting needles, candle wicks, etc.
- Add small props (like this bottle of vanilla extract in the top right corner) to fill in empty space.
- Sprinkle something! For food photos, choose an ingredient in your recipe. For product photos, loose tea leaves, flower petals, pearled barley, and oats all look awesome!
- Edit again. Is there anything you want to remove or add? Here, we loved the shadow the vanilla extract was throwing but it was being blocked by the black kitchen tool. So we removed the black kitchen tool. We also thought the photo could use a second dark element to match the vanilla bottle and balance the whole shot, so we piled some chocolate chips centrally and sprinkled a couple overtop of the oats to pull everything together and help draw the eye around the C.
- Get odd about it: Finally, add extra props to cluster objects in odd numbers. Here, we added an extra egg to the dish in the top left corner. How much better does it look with three eggs rather than two? What can I say, the eye prefers odd numbers!
Update since posting...
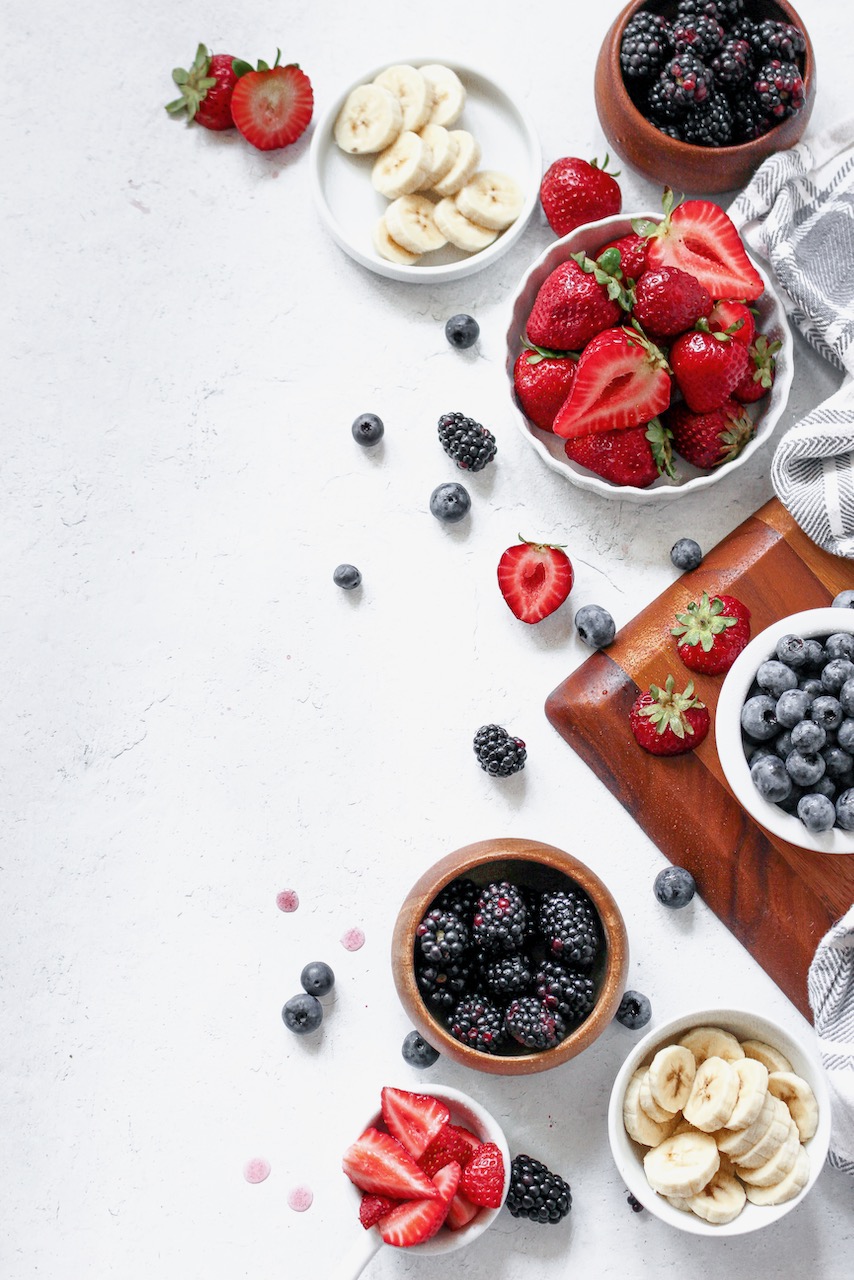
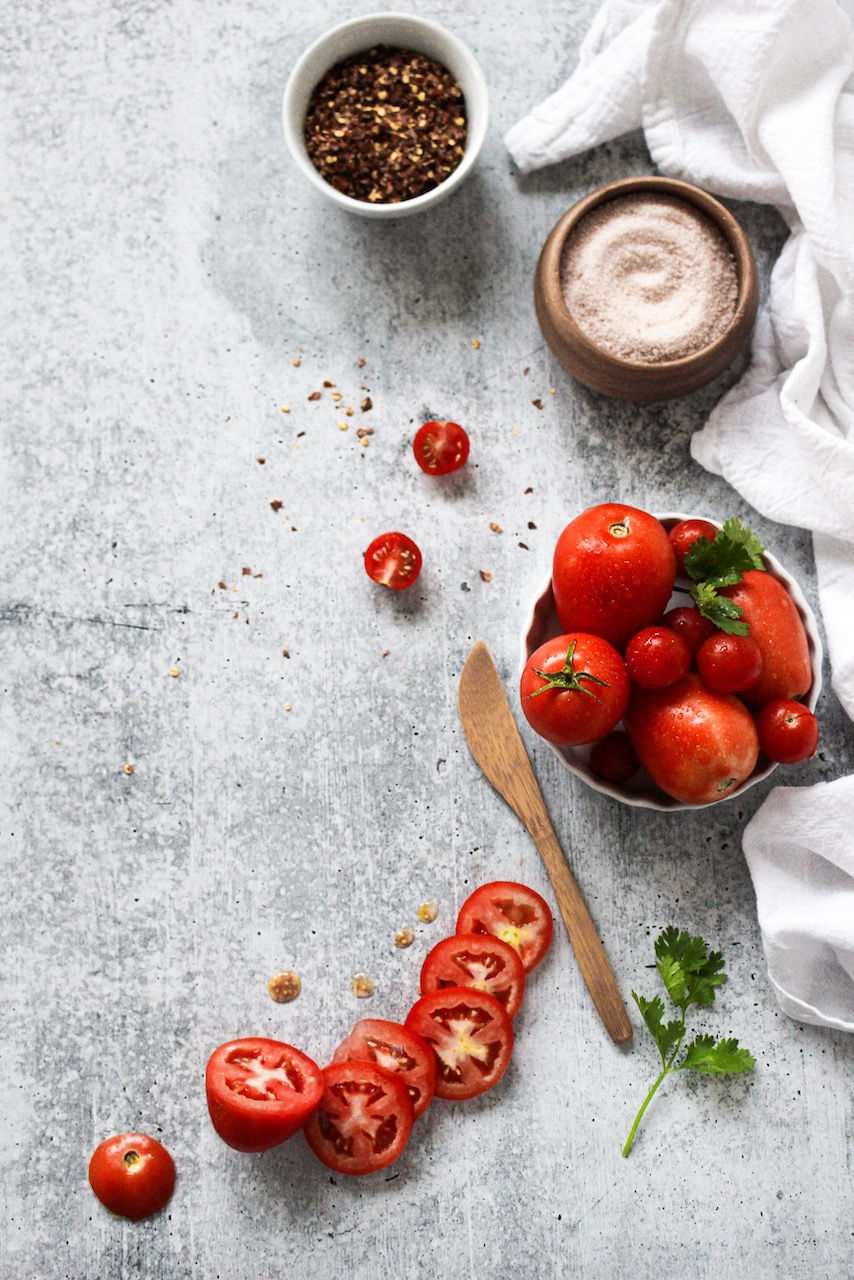
Since I first posted this how-to, I've been seeing your "C's" popping up all over Instagram and the Replica VIP Community! Here, Vicky of @littlechefwithin uses the "C" to showcase some gorgeous berry bowls and fresh tomatoes on her Plaster and Concrete Surfaces. Thanks so much for sharing, Vicky! You absolutely nailed it and I'm so happy this how-to helped you get there.
Prop ideas for food photos
If you’re a food photographer, the "C" is great for showcasing anything in bowls or plates - baking ingredients, smoothie bowls, salads, soups, whole and sliced cakes, and more. You can also create a welcoming “family style” scene by including your recipe on a serving dish with individual portions on smaller plates. For example, you would place your serving dish where the bow of strawberries is in the photo above. To suggest a table setting, use herbs, recipe ingredients, utensils, napkins, bud vases, and candles as props.
Prop ideas for product photos
Just like you saw with the art photo, the "C" is great for product photos too! Use it to showcase multiple items in your product line, swapping in your products in place of the bowls and swapping in the tools you use to make your products (like paintbrushes, knitting needles, or pliers) in place of the utensils.
A quick note about reflectors...
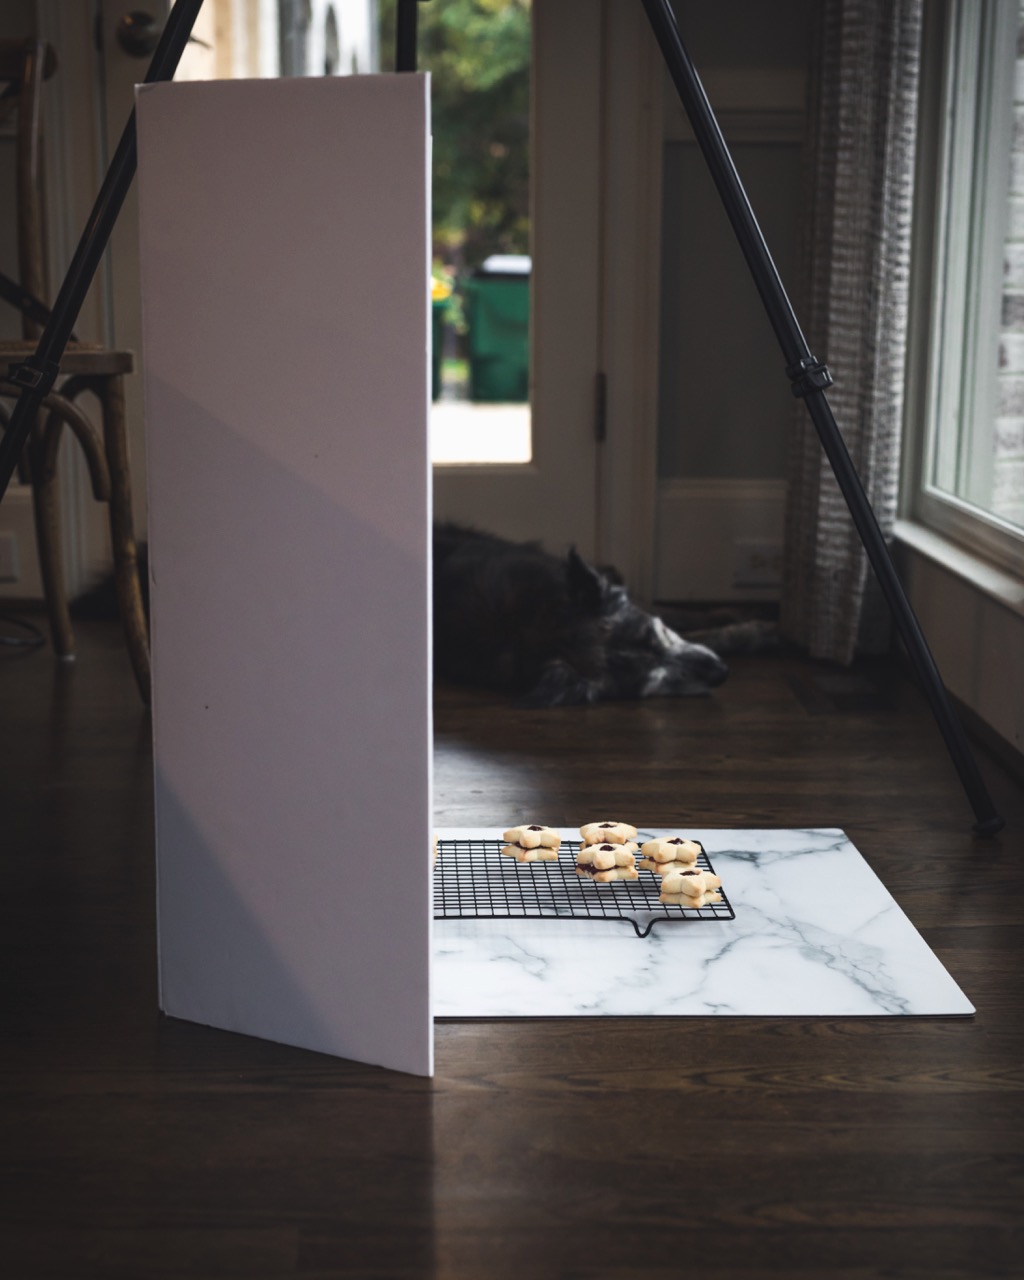
To soften shadows, place a white reflector opposite your light source. A reflector can be anything white: a piece of poster board, a trifold poster board, or the All-White Replica Surface (if you have it and aren't using it in your scene). Trifolds (like the one pictured here) are especially great because you can find them at any craft store and they stand up on their own.
Light will bounce off of the reflector and onto the far side of your scene, brightening the side that that isn't getting any love from your light source. Shadows will soften.
Disclaimer: sleepy, good boy not included with most trifolds.
The photos below show you what the same photo looks like with and without a reflector. When it comes to shadows, there is no right or wrong - it's all about personal preference. And I gotta tell you, I'd actually ditch the reflector in this case because these shadows look awesome to my eye!
If you aren't familiar with hard and soft shadows (or how to create them) yet, I've got a Natural Lighting how-to allll about that!
WITHOUT a reflector. Note the deeper shadows along the left edge of each bowl and to the right of the vanilla extract bottle in the top right corner.

WITH a reflector. Shadows are softened. Which do you prefer? Let me know in the comments!
Equipment to consider

If you’re in a position to invest in equipment, a tripod with a built-in 90-degree arm like this one will change your photo world!
With handheld flat lay photography, you have to put your camera down before every prop adjustment. Not only does this add time to your photoshoot, you also lose the beautiful frame you originally created since you’ll never hold the camera exactly the same way twice. Plus, your photos will be affected by some degree of motion blur no matter how steady your hands are. This is where the tripod comes in! A quality tripod with a 90-degree arm and bubble level fixes all of this! If you’re in a position to invest in your photography, this Manfrotto tripod is an awesome option – really great quality and it's one of their less expensive options. I’m in no way sponsored by Manfrotto, by the way, I just love their stuff. If you find a tripod that's better for you, go for it!
Eye level photos: the "Diagonal"
The next composition is for eye level photography and works beautifully for both food and product shots. We’ll call it the “Diagonal” for now, but definitely comment better names below! All of these photos were created using the Diagonal.

The key to the Diagonal is placing your objects in a diagonal line from back to front, with a tall object in a back corner, your subject in the middle, and a shorter object in the opposite front corner.
The Diagonal composition looks pretty basic when shot from above but full of depth in the final eye level shot when you shoot with a shallow depth of field. To achieve a shallow depth of field, choose a low f-stop (for DLSR cameras) or portrait mode (for newer iPhones). I go in depth about each of these methods in my Depth Perfection how-to.
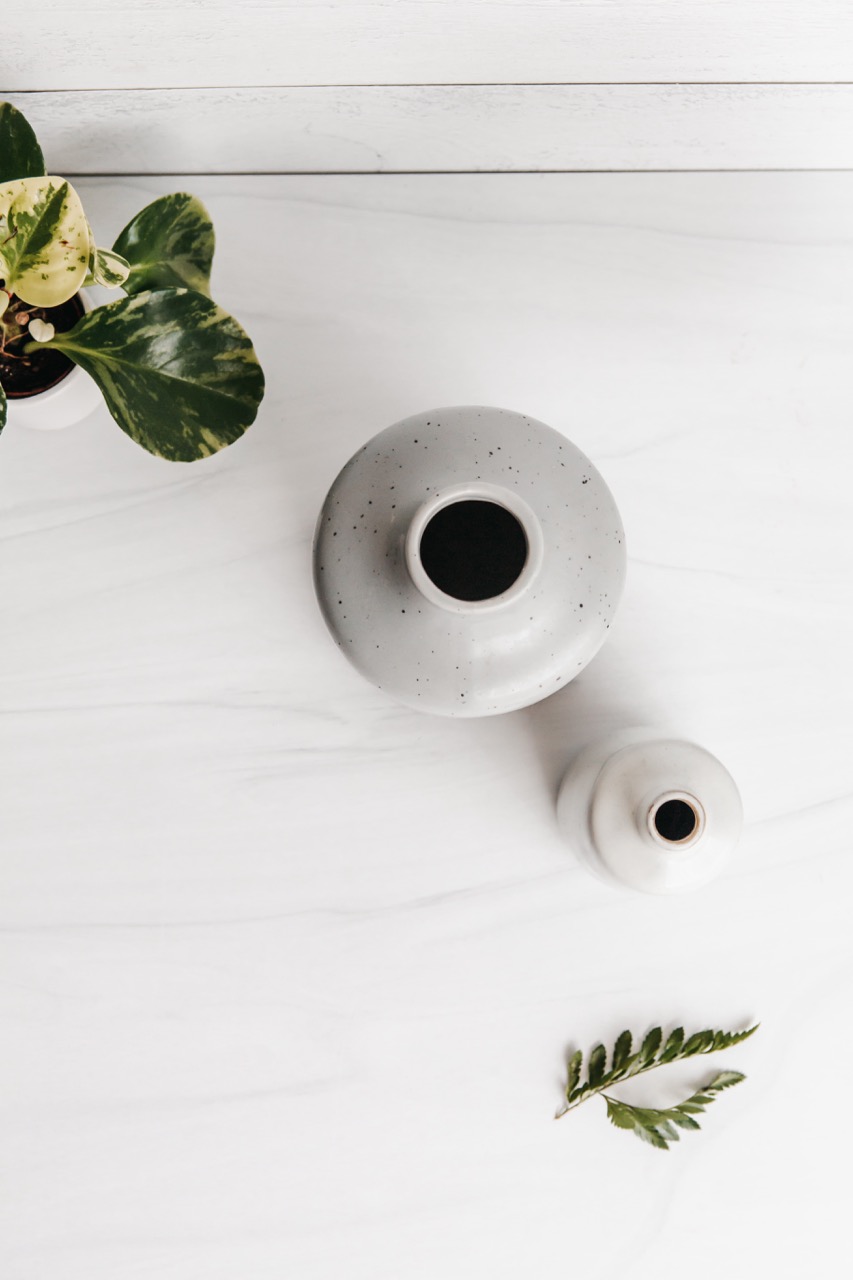
The Diagonal viewed from above. Note that props create a diagonal line from back left to front right. Also note that there is greater distance between the larger vase and the plant than there is between the larger vase and foreground leaf.

The Diagonal viewed at eye level. The vases are still the star of the show, but the plant and leaf props create a much fuller scene than if you just photographed the vases alone.
Alright, let's build a Diagonal using a beauty product instead! Start by placing two backdrops in an L-shape. If you use Replica Surfaces, Replica Stands make this crazy easy and you’ll never have to worry about your vertical backdrop falling forward and smashing your scene again! Next, add your props in three steps. Scroll for photos of each step. Isn't it crazy how weird the Diagonal looks from above but how good it looks shot at eye level? Pinky promise we didn't adjust anything between the overhead shots and the final photos!
Step1
Place one or two tall-ish props in the back right or left corner, directly in front of your vertical Surface.
Step 2
Place your main subject near the center of your horizontal Surface, at least 6 inches in front of the vertical backdrop. Keeping it at least 6 inches from your vertical Surface will keep it blurred when you shoot with a shallow depth of field.
Step 3
Place a short prop in the opposite front corner so that you’ve created a diagonal line when you look down on it. That’s seriously it!
For a bit more visual interest, add a towel or cooling rack under your main subject and build the same diagonal. Your final photo will look even more impressive with minimal extra styling effort. Scroll through to see the difference it makes! Of course, you can place your props in any order you want. No need to always start with the background prop.
And that's that - my two favorite compositions, how to use a reflector, and a piece of equipment that just might change your photo world! Comment below and let me know what you think.
Now where can I transport you? For some killer food styling techniques (like creating dripless ice cream) click here. For more flat lay and product styling tricks, give this one a read. And to learn more about shadows and natural light, this one's for you!

Great information about setups and products! I look forward to purchasing some of products.